Pages

Welcome Message

Welcome to my sewing (and other stuff) blog!

Sunday, December 30, 2012

Creating Custom Trim


 Here are the steps that I took to create a custom trim on a jacket that I made from a beautiful  tweed wool fabric.


I used Vogue 7975 view C, but I eliminated the pocket flaps, and  used the long sleeve pattern piece.
A quick search of our local fabric store confirmed my suspicions that there were no acceptable trims to purchase, so I created my own.

I pulled threads on the lengthwise, and crosswise grain of the fabric and discovered that the fringe that resulted were two different colors.


I also noticed that the selvedge had an interesting little detail. It is the bottom strip in this photo.
 I played around (only an obsessive seamstress would call this playing) with these elements and by layering them I created a trim that looked like this:

This was looking pretty good, but it still wasn't quite right. I pulled some of the long pink threads, and discovered that by tying knots and laying them across the trim it gave  the extra textural interest that was needed.


This was quite time consuming, but with a few cups of coffee, and some good music it was a happy afternoon!

Here are the results.

Monday, December 24, 2012

Sew Sentimental

                              The Lace may be tattered, but
                                 One thing that time cannot spoil,
                                 The love made into those garments
                                  Sewn by midnight oil.


Almost from the beginning of my love affair with sewing I felt a connection to other women that have taken up a needle and thread in years past. My collection of antique sewing tools has always been a nod to the history of sewing. A trip to Europe gave me an opportunity to view the extensive collection of antique textiles at the iconic Victoria and Albert Museum in London, and at home I have a few pieces that mean a lot to me. 

 This is a little wool flannel shirt that was made by my great grandmother (whom I never met) prior to the birth of my grandfather Dallas in 1896.
  The blue and pink cross stitches that adorn the piece were insurance that it would suit either a boy, or a girl.
 I can feel the love that went into the handwork on this tiny garment.


My mother's mother Clara spent part of every day at her sewing machine. She made beautiful cotton flannel nightgowns and pajamas for all of her grandchildren. Each nightie had tiny mother of pearl buttons and perfect little hand worked buttonholes. Despite my grandfather's many offers to purchase  an electric sewing machine she continued to use her treadle sewing machine. I can remember the soft, rhythmic sounds that the treadle made as she worked it with her feet.

 My grandmother also made beautiful quilts using her plentiful scraps. She and the neighborhood women would get together in my grandmother's dining room and sit around the quilt frame visiting while their fingers made perfect little stitches almost without any thought. There were numerous coffee breaks where trays of delicious little buttery cookies would appear, and more than a little competition to see who could make the most even quilting stitches and the flakiest baked goods.

This is a photo of the quilt that I have made by my grandmother. A few of the fabrics remind me of the dresses she made for herself. One time my twin sister and I were playing in her closet, and we counted 36 house dresses! Clara loved to sew, and I loved being in her sewing room while she was sewing.


 My mother has never used a sewing machine but she did spend many happy evenings doing needlework in the 70's. She embroidered this sampler in 1971.
 My mother-in-law did gorgeous needlepoint! She tried to teach me a few times, but it just wasn't a skill that called to me. This is a photo of a pillow that she stitched in 1991 for the waiting room in my dressmaking shop. It is so whimsical! She is no longer living, but this pillow brings wonderful memories of her.


 Occasionally I think that perhaps someday my granddaughter may pull out the little batiste christening gown that I made when she is born, or that my daughters will happen upon their wedding gowns that I sewed for them. It will be O.K. if these garments sewn with love are a  way that they remember me....

Sunday, December 23, 2012

Amazing "quilted" silk shantung


This is a very unique fabric! One side is a grey on grey stripe silk shantung.


 The other side of the fabric is a green shantung that has been quilted creating a lot of depth and textural interest.


 One of my clients brought me this  beautiful and expensive fabric.  Fabric like this really requires thoughtful planning. I thought about the party that my client would be attending in this garment (New Years Eve), I thought about her figure, and I thought about how to make the most of the fabric. I left the fabric sitting out in my sewing studio, and let it "speak" to me. Both sides of the fabric were incredible, so rather than choose a right side I decided to create a two piece outfit that featured both sides of the fabric.
 I designed a  vest with extended shoulders to balance her figure, and a narrow wrap skirt.
I put the vest front opening facing on the outside of the vest to introduce the grey stripe. This is an easy technique that asks the question.."why do facings always have to be on the inside"? I used a  bias band on the inside to finish the armholes. The focal point of the vest is a narrow bias tie threaded through a unique vintage abalone buckle that I had in my collection. I made a jewel neck grey silk chiffon blouse to wear under the vest.
 One of the interesting features of the fabric was that one selvedge had a fringe of bright green silk fibers, and the other selvedge had a 3" border of just the grey striped fabric. My fascination with selvedges helped me to design a skirt that I could embellish by combining the two selvedges.
 I made a false wrap skirt set on a shaped yolk. The opening of the "wrap" is embellished with the narrow bright green selvedge sewn over a pleated band of the grey silk selvedge. This creates a lot of textural interest, and makes the skirt very slimming with the pronounced vertical line. The skirt has an invisible zipper at the center back.
 I like to write posts about the design process  because I frequently hear from students that it is a challenge to decide what style garment best suits a special fabric. This fabric is quite crisp. Two layers of  closely woven fabric laminated together meant that the fabric was not at all drapey. One of the challenges of sewing is to make flat fabric fit around the curves of a body. The shaped yolk at the top of the skirt was a way to address the waist to hip curve and make this stiff fabric flattering to my client's figure.
  Creating a beautiful garment from this special fabric was pure joy!

Tuesday, December 18, 2012

Great Dress Form


 This post is about a dress form that  has a fairly good method for approximating a woman's figure. Prior to discovering the "Uniquely You" dress form  I tried another method that was quite the adventure.
 My daughter loves to sew, but has a number of  fitting challenges. A few years ago I bought the supplies to do a duct tape/liquid foam type of dress form. She put on a plastic garbage bag, and I wrapped her snugly in duct tape from neck to below the hip. (I have photos of this, but I am too kind to put them in this post). It was quite the process, and I feel claustrophobic just remembering encasing her in that tape! Anyway, the next step was to cut one side of the tape open so that she could escape that rig. Next we taped up the cut side, and then opened two cans of a liquid that is used in boats to give them buoyancy. It smelled foul, and it expanded at such a rate, and with such force that it pushed the cut side of the duct tape apart. There was much laughing and a little swearing as we tried to make that noxious stuff behave itself! Needless to say that wasn't a very satisfactory representation of my daughter's figure.
  I had read about Uniquely You dress forms and I ordered one of these for my daughter for her birthday. This turned out to be MUCH more satisfactory.

Uniquely You Dress Form
 This is a neat system. A large box arrives, and in it is a foam "body" that has the biggest breasts you have ever seen, and an ample waist and hips also. There is a beige cotton cover that is used  to firmly compress the foam into the desired shape. The company makes a range of foam form sizes and cotton covers to allow you to order a size closest to your measurements.The process for this transformation is written in a way that is sort of difficult to understand, and the art work looks like it was printed in 1955....anyway they could update and clarify their brochure.
 This is a two person job. The person who is NOT having her body reproduced should know how to sew, and have some fitting skills. The cotton cover is zipped on, pin fitted, removed, sewed and zipped back on numerous times until the cotton cover is SO tight that it is as close to the body as possible.
 The fitted fabric cover is now zipped over the foam greatly compressing the shape until it is a very, very close representation of the women's figure.( Having done this with about 6 women so far I know that  you must be prepared for the hysteria that occurs while trying to wrangle this foam into it's straight jacket...many times strong husbands have to be summoned to help...can you imagine the looks on their faces...) The kit also comes with a metal floor stand.
 Anyway, not only is it a great, dress form it also is a lot of fun to put together. The one I made for my daughter is in the photos. I marked the waist with a fabric pen to help her fit the garments she makes. She told me that it has  made it much easier for her to sew for herself. Uniquely You dress forms can be ordered from various online vendors. They seem to vary in price but are in the $150 to 210.00 range.


Monday, December 10, 2012

Kooky Bound Buttonhole

 I taught a bound buttonhole class a few months ago, and this morning I  came across a sample that I made to show the students. The goal of the class was to teach the students how  to make a beautiful bound buttonhole, but I also wanted them to think about using a buttonhole as an art element in a garment.
 This buttonhole is a triangular opening that I made in a piece of woven silk using some silk organza as a facing to finish the raw edges of the triangle. The inset pieces are cut of silk shantung and the "lips" are finished with corded piping cut on the bias from a striped dupioni.
 This buttonhole sample was really fun to make! I have used all different shapes and fabric combinations over the years to make cool bound buttonholes! (explains why I never learned to golf!) Just think about how the dreaded bound buttonhole could be your new passion!

Sunday, December 9, 2012

Making Pattern Changes

 One of my friends who loves gorgeous fabrics brought this beautiful boiled wool leaf print fabric to my studio. It was on a shelf, and every time I noticed it I loved it more. Fortunately this friend understands fabric lust, so she was kind enough to let me have the fabric!
 I had purchased Butterick #5679  some time ago because I loved the cowl neck in view B, but  I made a number of changes to the pattern to enhance the fabric. First of all, I eliminated the center front and center back seams. It seemed very unnecessary to have a seam marring the beauty of the fabric. View B has a belled sleeve that I did not want, so I used the narrow sleeve pattern piece from view D. (the pattern pieces were identical other than the width at the lower sleeve). I also chose to use a graceful curve at the hem instead of the points.

  I want to show that we can make choices when we design a garment. I loved the cowl neck, raglan sleeves and longer length in this Butterick pattern. The belled sleeves, pointed hem, and center front seam were not to my liking.
 This tunic went together very quickly. I sewed the seams with my straight stitch Juki, and then  finished the seam allowances with my three thread serger. I put the sleeve hem, and curved lower hem in by hand.
 Considering our cold climate, my desire to have casual, but attractive clothing, and my love of this special fabric I  know that this tunic will get plenty of wear. If fact, I wore it yesterday and I had a number of compliments on my new creation.
 Commercial patterns can be a great starting point, but we can certainly make changes to suit our fabric choice, and our personal sense of style.

Thursday, December 6, 2012

Priceless tip!


Here is a quick tip that could be big if you sew women's clothing.

 If you have ever made a top with a scooped neckline you probably  found that the neckline gaps.
 I circled a tank on the pattern envelope  to show the type of neckline that is frequently too big.


 This is the way the front pattern piece looks.


 The easy solution to the gaping neckline is to slightly angle the center front (which is supposed to be right on the fold) off of the fold as shown in the photo below. This little tilting of the pattern piece automatically brings the scoop a little closer to the body. You may think that this will distort the grain of the fabric, but it doesn't. The pattern piece should be 1/4 to 3/8th " off of the fabric edge at the top, and then angled back to the fold . That takes just enough out of the bodice front neck to cure the gaps! I have used this technique on V necks also.

P.S. You must remember to do the same thing to the front neck facing.


Tuesday, December 4, 2012

Embellishment Decisions

Wool Jersey Felted Lace
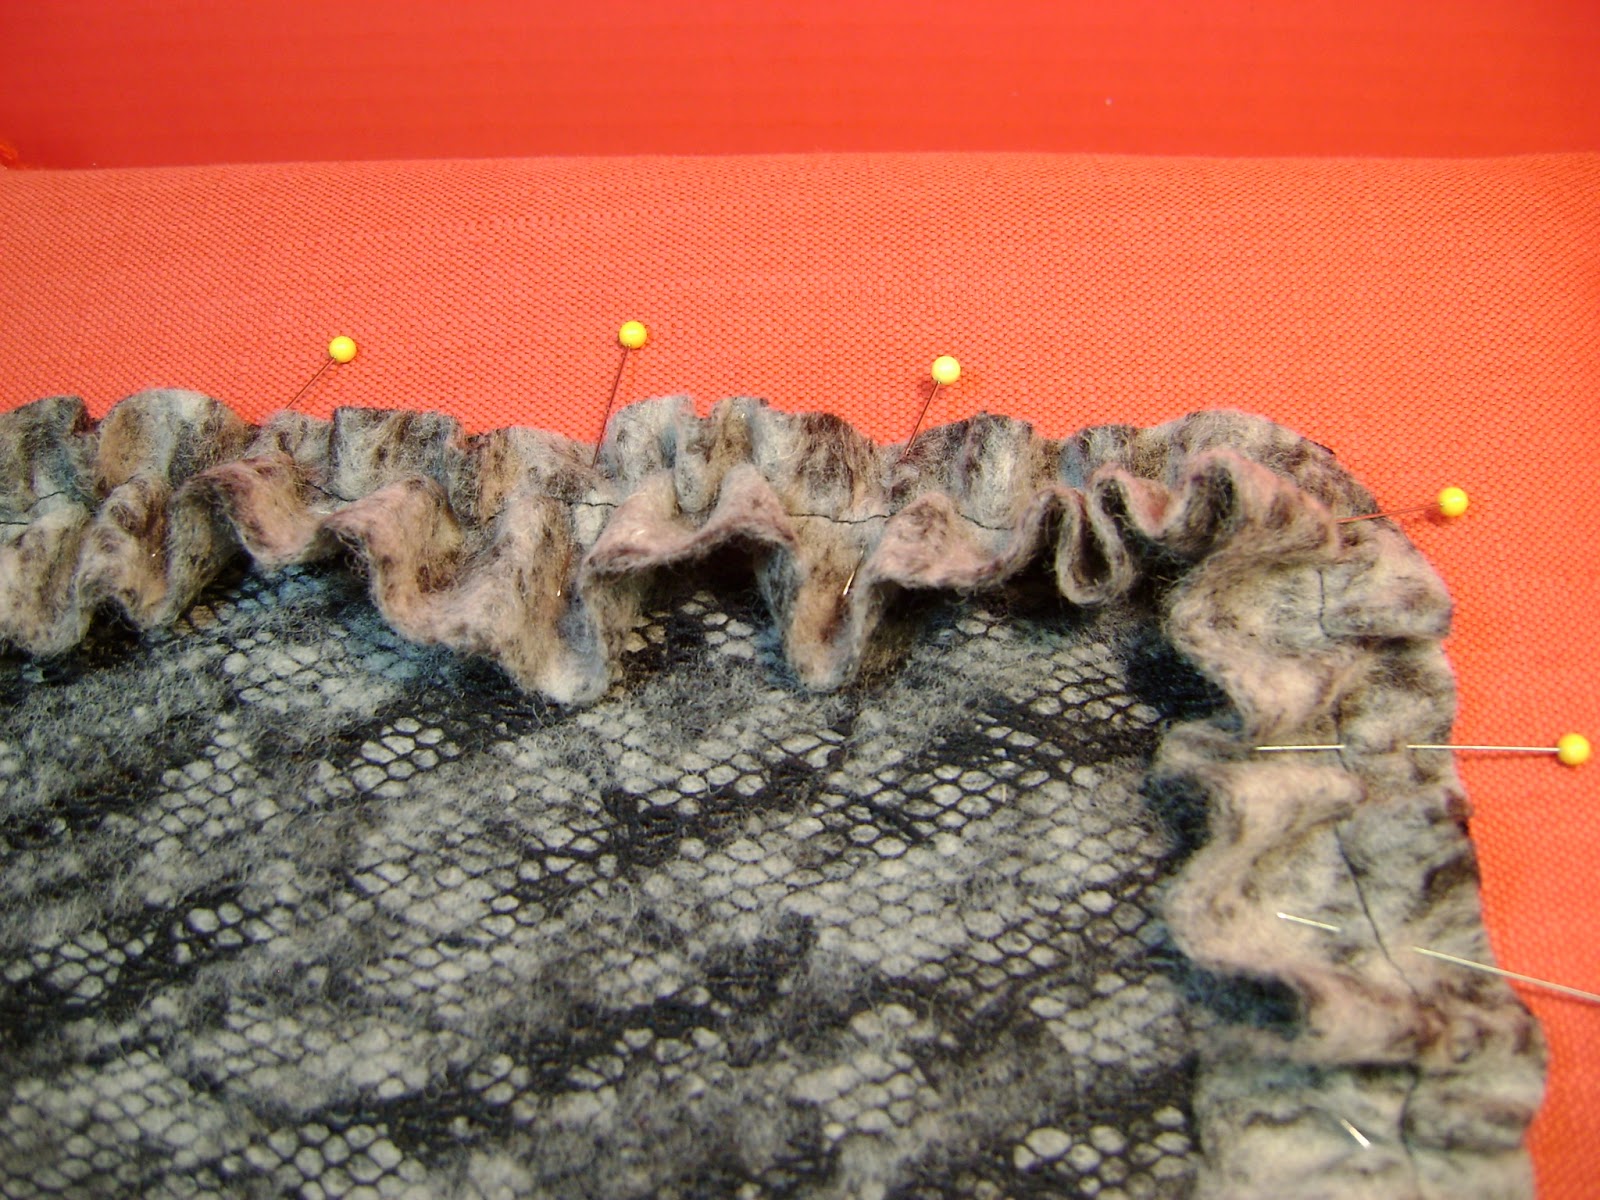
 This is a beautiful and unusual fabric. In thinking about making a zipper front jacket I assumed that the fabric would have enough interest on it's own, but once I cut the jacket pieces, and began assembling them it seemed that the jacket would lack "punch".
 I played around with a variety of black braids and trims, but nothing worked well. I noticed that the wide selvedge of the fabric had a knitted edge. I cut some strips of that edge, and experimented until I came up with a narrow ruffle.


 I used a gathering stitch on the cut edge of the fabric, and then pinned the piece onto the front placket covering the zipper, and also the collar.


 The gathered selvedge edge of the fabric makes a perfect trim, and gives the jacket the focal point that it needed!


Saturday, December 1, 2012

When Both Sides of a Fabric Look Great!


I've had this beautiful piece of wool yardage for a number of years. It was difficult to choose which side of the fabric I liked best, so I decided to use both sides to make a tunic length vest.
 The side of the fabric with the cream ovals looked best next to my face, so I cut the vest planning that side for the collar. I made a bias band to finish all of the garment edges.


The selvedges of the fabric were interesting, so I used them at the center back seam.


    This is an easy and fun way to use a double sided fabric!

Wednesday, November 28, 2012

One of My Favorite On-Line Fabric Stores

Emma One Sock is a wonderful website where you can find gorgeous fabrics! The owner, Linda Podietz travels to New York frequently to hunt down fabrics from some of the top designers. Over the years, her site has grown...due in some measure to my own purchases, and those of my friends and students. I have always found the quality of her fabrics to be superb, and she sends out free swatches.
  Linda communicates very well with her customers, and ships orders quickly. I check out her site almost daily to see what treasures she has found.
 Recently, I ordered a French rayon voile in a luscious blend of blue, green, plum, and red. I made a special occasion dress and a piped and stitched belt.

            If you want to have some fun shopping for beautiful fabrics while sitting on your couch go to:

www.emmaonesock.com                                            

Tuesday, November 27, 2012

We Rip What We Sew

Why do we need these?
 Many of my sewing students are appalled when they see my numerous seam rippers. One of the concepts that I explain in the first few classes is that if they want to sew, they have to rip!
I have noticed in life that most lessons are learned only after a bit of pain. Sewing is no different. The time ripping out improper stitching gives us an opportunity to think of ways to do better the next time. Over the years I have actually come to enjoy my time with a seam ripper. No matter how much skill we acquire there will always be a need for ripping that which we have sewn!

Mother-of-Pearl Buckles

1940's Mother-of-Pearl Buckles
These beautiful and unique buckles adorned many frocks!
Posted by Picasa

Monday, November 26, 2012

In Praise of Piping

There are few embellishments that are as versatile as piping. In all honesty I am sort of addicted to piping! I am not talking about the generic piping that is sold in fabric stores. Prepackaged piping is overly bulky for most applications, comes in a small range of colors, and is covered in broadcloth of marginal quality.


This post is going to teach a technique for creating your own custom piping. It is easy, and can help define the interesting fashion details of a  garment as it is easily inserted into almost any seam. Here is a photo of the seam between the yolk and the body of a jacket. I inserted piping that is covered in a striped fabric that I cut on the bias.
                                    How to make Custom Piping                                                       
 I use inexpensive crochet cotton as the cording for most of the piping I use in garment construction. It is labeled 4/4 100% cotton and is on a cone holding 690 yards. It is very inexpensive.


 I am using a silk shantung for this tutorial. It has a lovely natural luster and because this piece is a check it will look very nice cut on the bias. Fabric for piping is best cut on the bias because the fabric wraps around the cording more easily, and the finished piping can be sewn into curved seams very smoothly.
 To find the bias grain of the fabric take a square of fabric and fold it like this.


Cutting along this fold gives a bias edge.


Cut 1 1/2 strips.You can sew strips together to create enough piping for your project.


Pin narrow cut edges like this.


Sew seam at 1/4"


Using a zipper foot fold the bias strips of fabric around the cording. Sew, keeping the edge of the foot right up against the ridge of the cording.


This is finished piping!


 How to sew piping into a seam:


Using the zipper foot, lay the piping on the seam line (usually 5/8").
Sew with the foot snug against the cording.

Pin the other piece of fabric to the piped piece, and sew right on top of the first row of stitching that held the piping in place.


Flip the fabric over, and press the seam. You now have perfectly inserted custom piping. You can use this technique is limitless ways to give a real look of quality to your sewing projects!